
After a night of patient waiting the glue has dried and we have strong joints all around. We could stand directly on the top of the bench and would be ok. No one though ever site directly on something though, and this will be used by a child, climbing, jumping, and other shenanigans are to be expected. Additional structural support will be required. Since this is also a book shelf, we want to prevent things from falling out the back. The solution is a simple backing.
First problem for today: the wood used for this project is white board. If you have been following along you know by now that it’s a decent enough base for a project but requires some extra work because its inherently crappy wood. If you haven’t read it I will wait (part1).
All caught up? Great!

If this was properly square then the backing board would line up. It’s sadly not, but only slightly off. Easiest solution will be to mark out the outline of the bench and then cut. I keep the precut straight side at the top as this will be the edge that is seen most often. While I can do some fairly straight and clean cuts, the manufacture does it better because they do it every day and have the equipment. This is a concept we seem to struggle with in the IT world.
We hear about the success of the large service providers like the Amazons, Microsoft, and Googles of the industry who have built their infrastructures on “white box”. They report great savings on their hardware capital by using lower grade hardware and software to build out the features that are provided by enterprise grade solutions. They have two major things that make it work:
- Economics of Scale
- Talented Technology Specialist
These are the two elements that make them appealing as both service providers and IT companies. They also have the capital to make both of those elements work. When smaller entities look at this type of success the first thing they want to do is emulate the same type of success. The pitfall is when they want to take the same all or nothing approach. A hybrid approach is also a choice, and in most cases the right choice.
With our project we are working in the manufactures skill set and economic of scales into our design.

For the observant the backer is still original wood color and not our new pink. I intentionally did not stain it during the first pass as the piece of wood that is to be used for the backer is rather large. This would mean a lot of wasted stain and would mean that the extra could not be used in any other project. I’m a large fan of being able to reuse parts of one project for the next when it makes sense.

A quick (12 hour) application of wood conditioner and stain and we have a backer ready for assembly.

For securing the backer to the rest of the frame I prefer to use a trusty brad nail gun. Now some things to keep in mind:
The bradly nailer is actually not going too fully penetrate the backer and frame. It’s actually not designed to on larger brad and will leave the top of it slightly out. You will need to use a hammer to flush out the brad. This is normally not a problem when its being used on quarter round and smaller gauge nails.

The bradly nailer will not penetrate knots. It’s a low gauge low powered system designed to be used on thin woods, such as base boards and crown molding. If you attempt to use it on one the nail will either bounce off or worse, jam in the nailer.

In this projects case I got lucky and the knot on the backer and top lined up making it very easy to skip that section. Since the backer will be secured from 4 angles we do not need to use any glue. If you feel the need for an extra layer of security feel free to glue the backer on.
With the backer on the bench it’s not starting to look like a proper bench and book shelf. My beta tester has given it great reviews as well!

Unfortunately management thinks the product doesn’t look very bench like. So we will need to make some modifications. The development team and management went through a few ideas with scrap pieces we had lying around.


We decided that we will add some sides to the top to get it a park bench feel. I have no idea what that means but the new requirements are to make it rounded and not look terrible. This should be fairly easy to achieve. Since rounded is some derivative of an eclipse I will just use the circle off the sander pad. No need to reinvent the wheel.

Two quick cuts on the band saw and we have the edges.
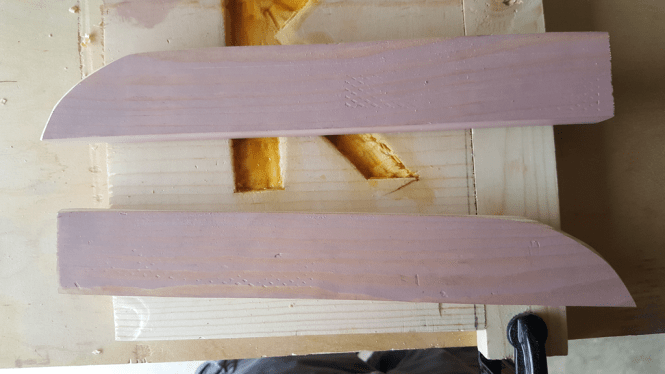
Second requirement was to not look terrible. Beauty is in the eye of the beholder. There are lots of ways to do lots of things. I could attach these right on top at the edge but I personally think it looks unnatural (yes I know pink is not the natural color of wood).

Instead if they are slightly off set by ¼” it breaks up the sight line and makes it more appealing, at least to me. Since my eye is not the beholder a quick proposal to management for approval and were full steam ahead.

Now attaching this will be the challenge. Since were slightly offset we can’t run a peg through the base and into the sides as we did with the rest of the frame, this would punch a hole through the bottom. While it’s the underside of the surface I would know the peg is there and it would keep me awake at night. The solution is to use double sided furniture nails. They are nifty nails that basically have points on both ends. To date I have needed to use them twice, so I don’t own any. They are relatively easy to manufacture though with a cuter and panel nails.
First we tack the nail ½ into the wood.

And then taking the cutting tool of choice cut the top of the nail head off at a 45* angle. I use a dremel as my tool of choice but any decent set of tin snips will work as well.

I do three of these in a straight line, 2.5” apart. Glue up the sides and line them with the nails and give them a few good hits with a dead blow hammer. This will seat the sides against the tope. Just like with the peg assembly we will need a proper application of pressure to have the glue laminate the two pieces.

Now were back to the waiting game.
Ingenuity and problem solving are key skills when putting together anything from their base parts. The end product here could have just as easily come from an Ikea or Target. Since I do not run on an economy of scale I can recognize that I will not be saving anything on this project by doing it myself. What we are producing is something that is unique to the project needs with out costing an excessive amount.
Next Time
Certificate of Completion